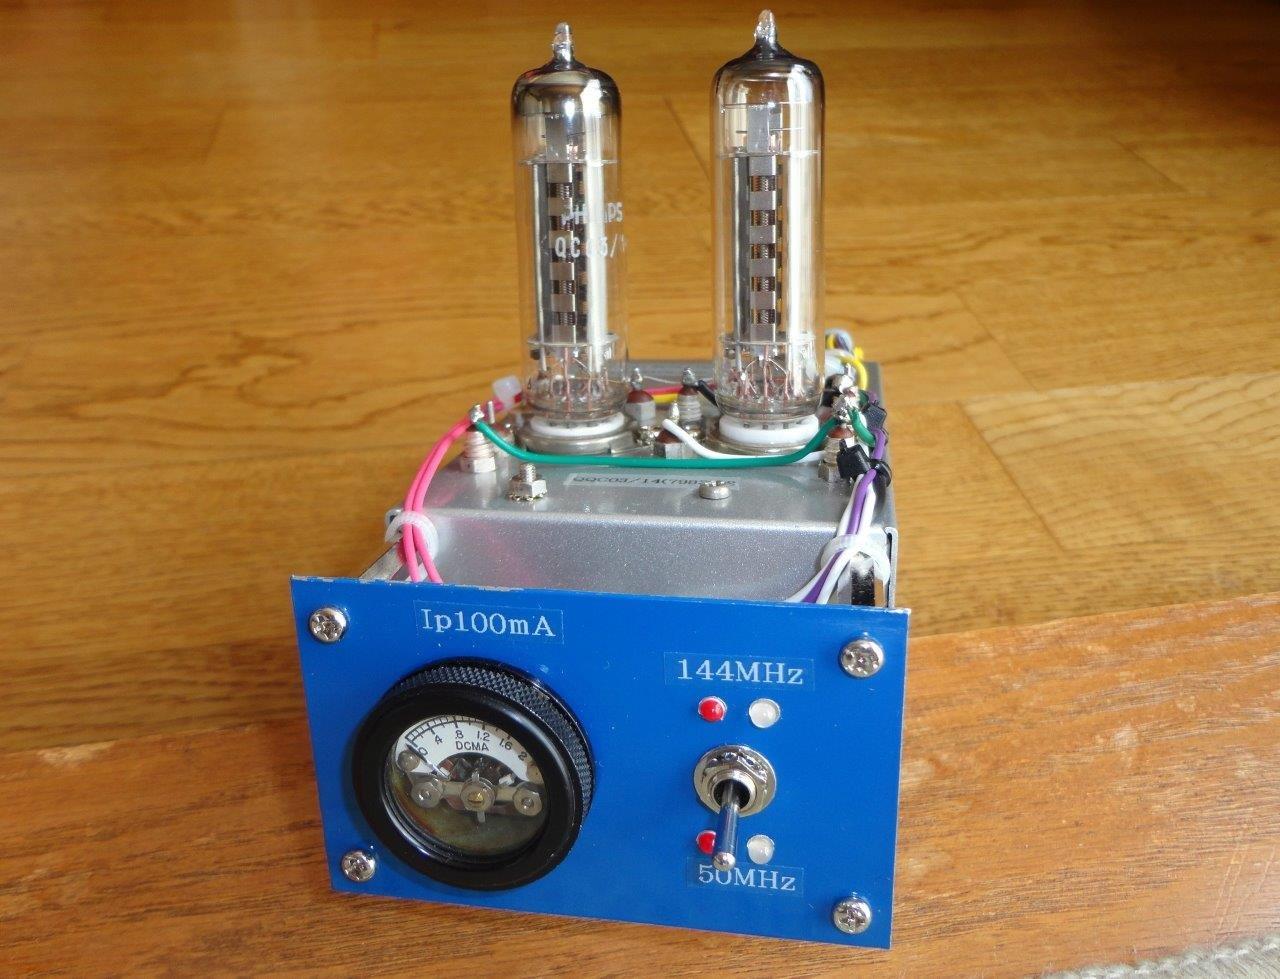
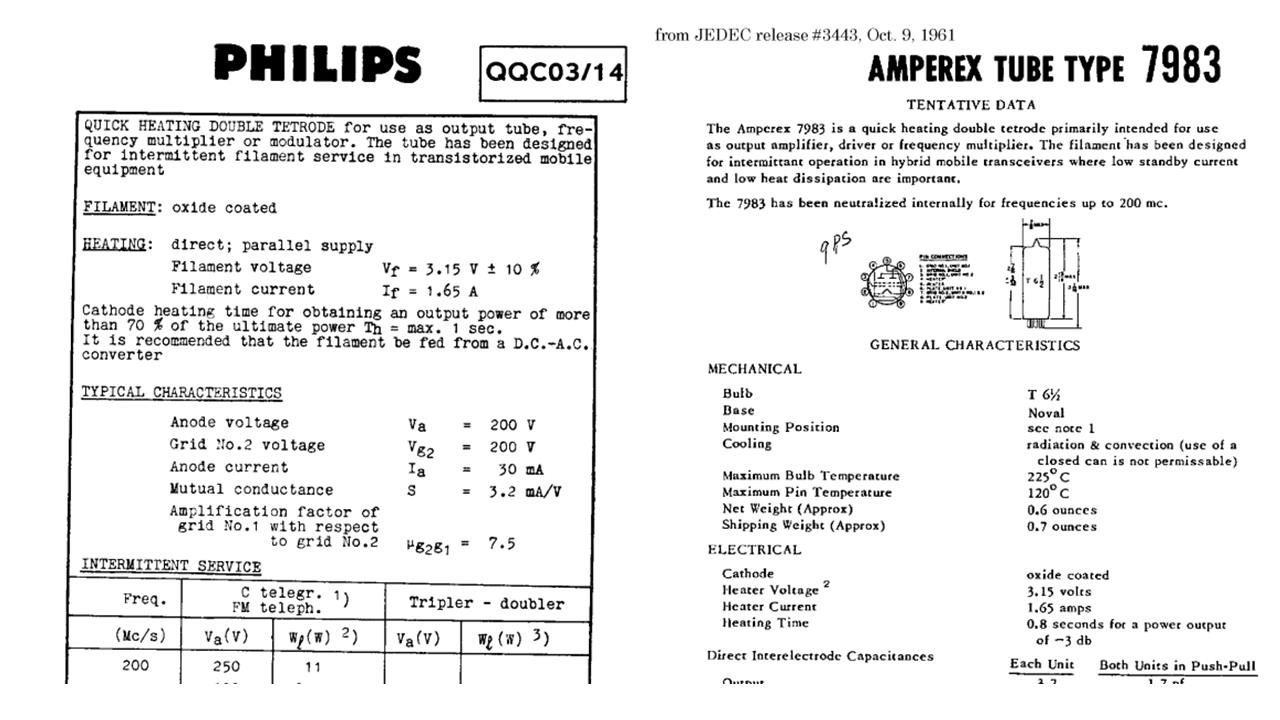
ある日JA0BZC/矢花さんから、「6360の直熱管(フィリップスQQC03/14;米国規格では7983)が手に入ったよ」と連絡を頂いた。この球は1960年頃に車載のハイブリッドFMトランシーバ用に作られたもので、フィラメント電源投入後1秒を待たずフル出力に到達することができる。Eスポのように急変し易い伝搬ではタイミングが重要なので、管球ファンのQRPerには打ってつけかもしれない。自分も長く6360ファンを自任する一人なので、早速50MHz/
144MHz dual bandアンプを製作してみた。
【製作のポイント】
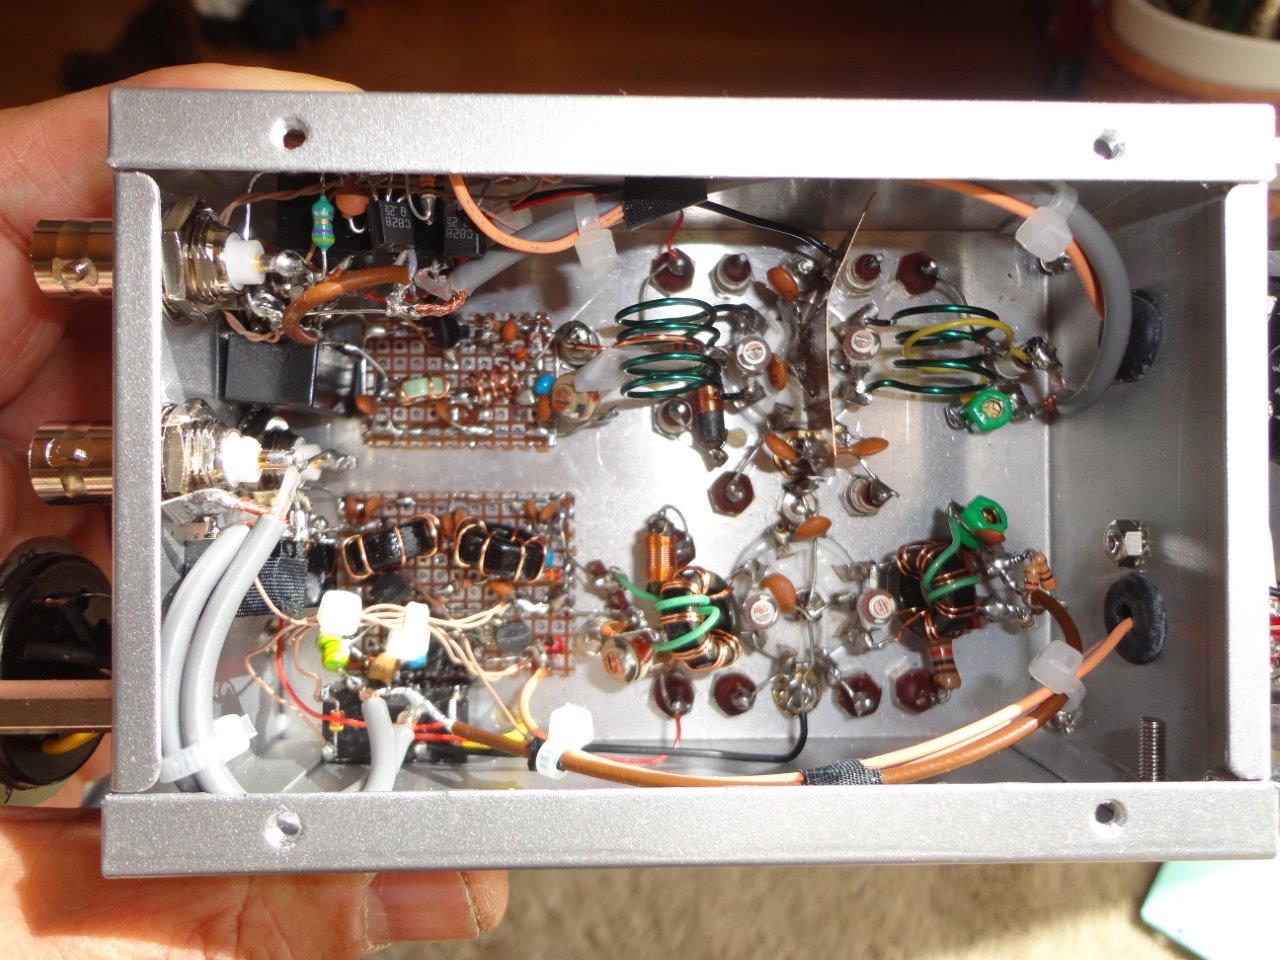
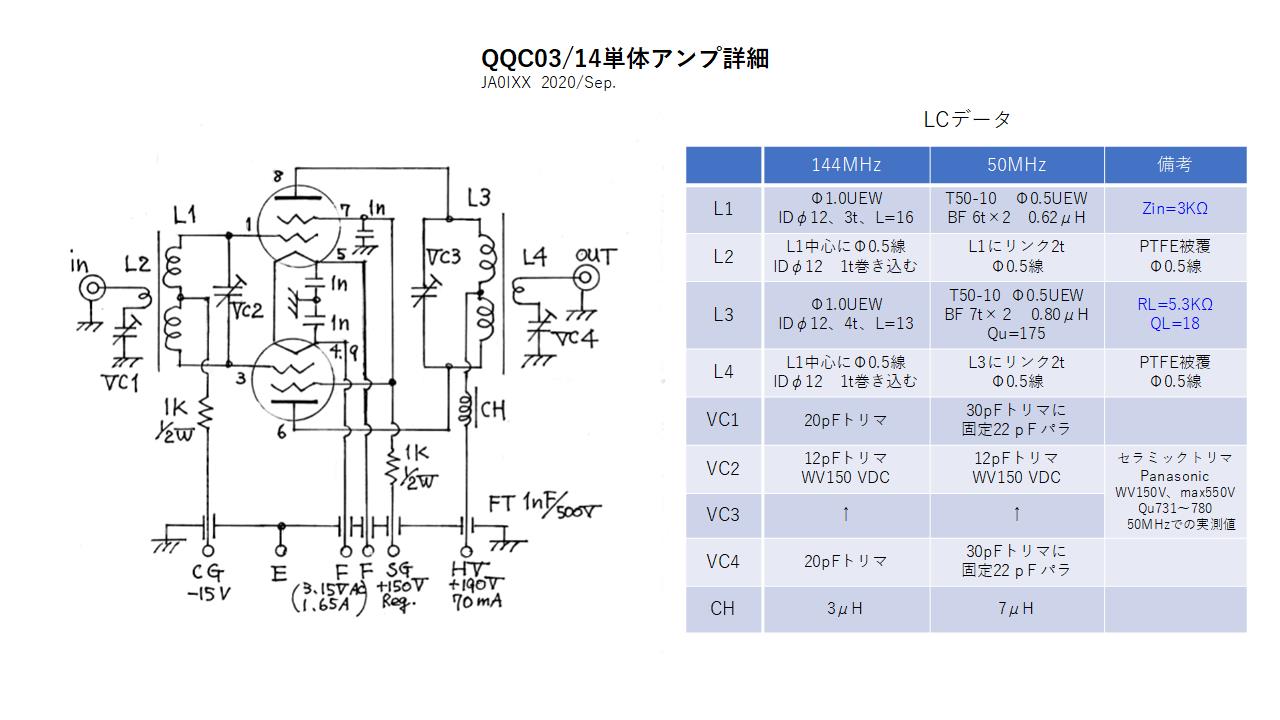
矢花OMの最近の50MHz/6360実験アンプを拝見したら、入出力同調にはバタフライもスプリットステータも使わず、松下の小さなセラミックトリマで済ませている。コイルは伝統的な空芯タイプではなくトロイダルで、その結果中央のシールド板さえ不要になり、全体は随分コンパクトに。これは優れたアイデアなので、そっくり真似させてもらうことにしたが、144MHzはコイルQが大幅に低下する(T50-12では60~70)ため、仕方なしに「シールド板+空芯コイル」の従来構造とした。
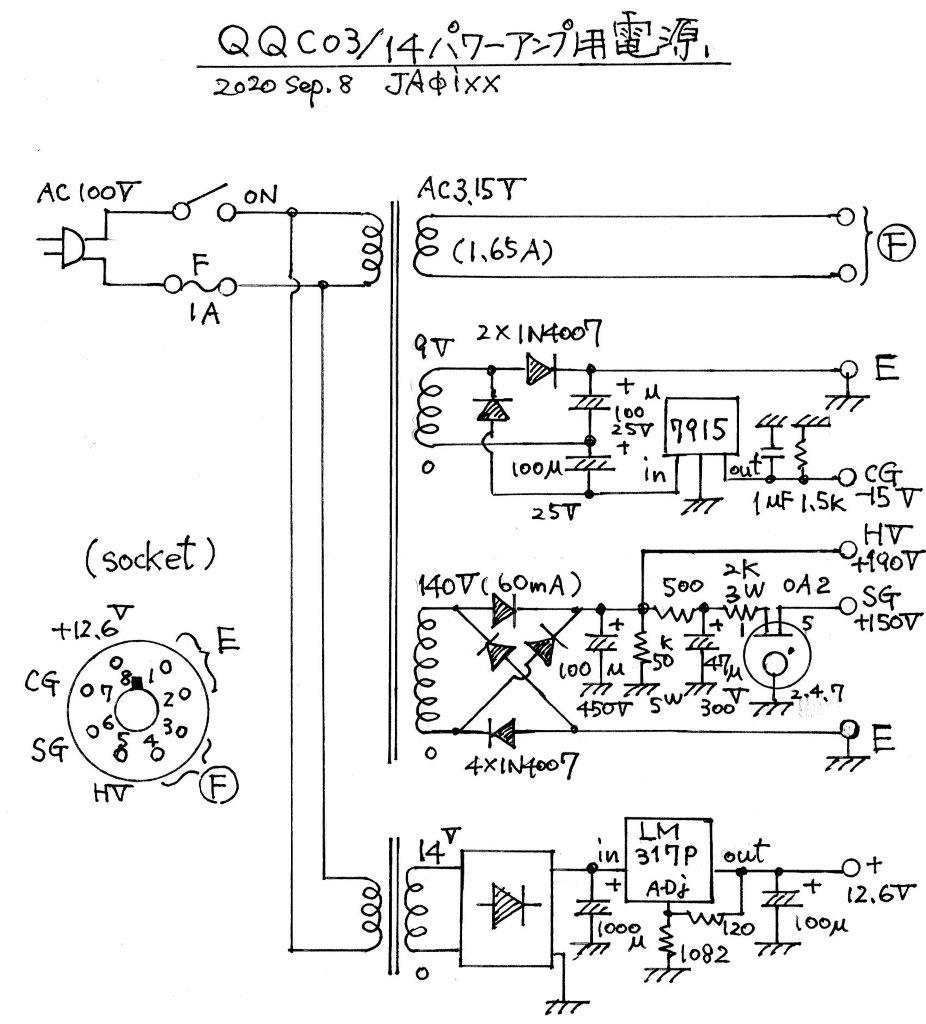
電源はかつて6939送信機用に作ったものの転用で、SGは150Vに安定化し、CG用電源にはAB2級動作を意識して-15Vの三端子レギュレータを使った。電源各ラインは、両バンドのユニットに常に接続されており、フィラメント電源のAC3.15Vと制御用DC12VだけSWで切り替えてバンド選択している。
【調整】
基本に忠実に、以下をキチンとやればOK。①ドライブ電力を0.15~0.2Wにセットする。 ②入力側にSWR計を入れ、グリッド側の二つのトリマでベストマッチ(SWR1.2以下)させる。
③出力側は、プレート電流の同調(ディップ)をキープしながら、徐々にANT結合のトリマを入れて負荷を重くしてゆき、目標のIp (65~70 mA)にセット。→②と③をもう一度繰り返す。管内に自己中和電極が有るので、6360や6939同様ニュートロを取る必要は無い。
【まとめ】
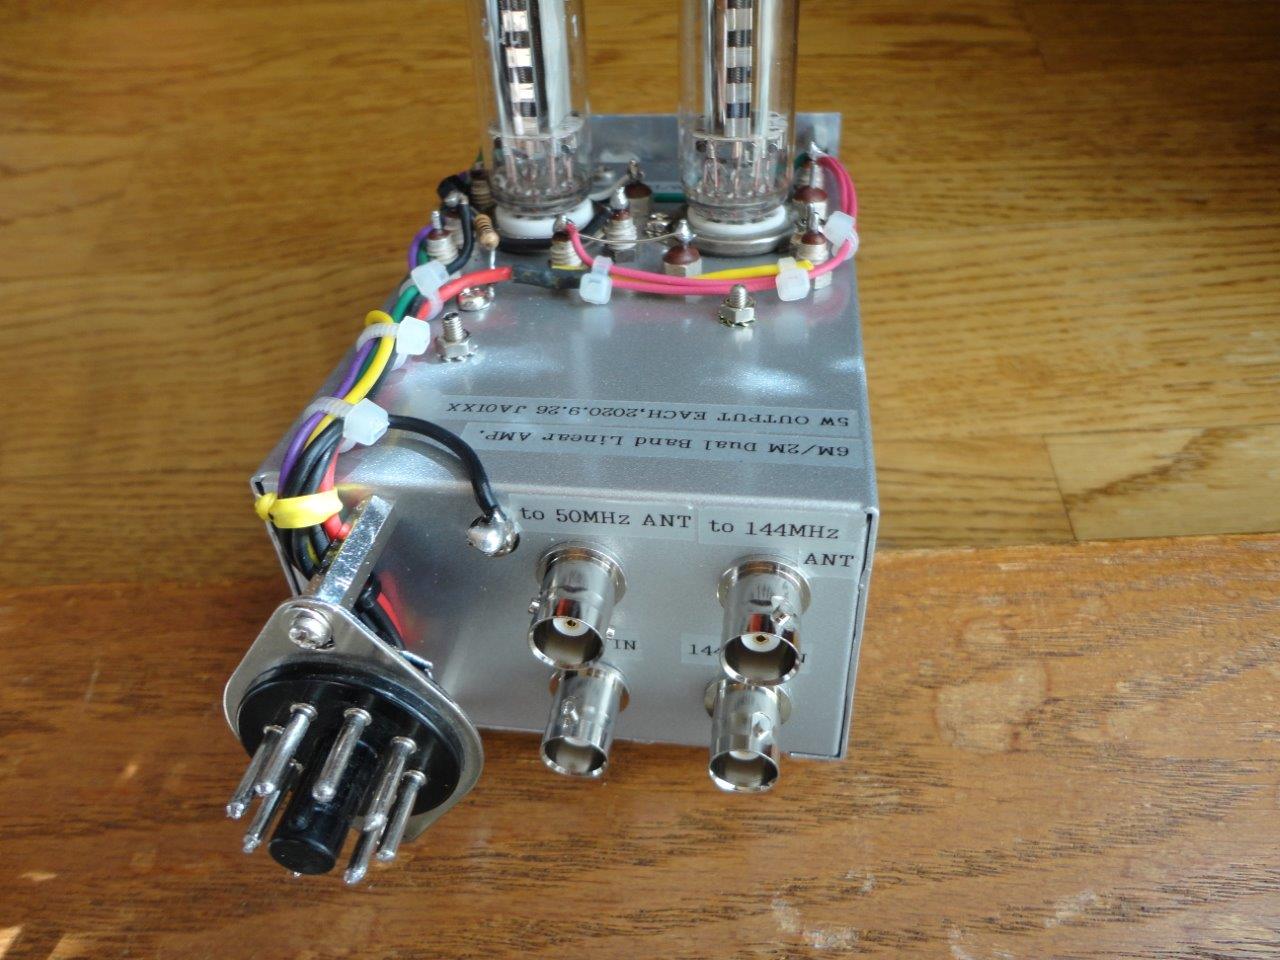
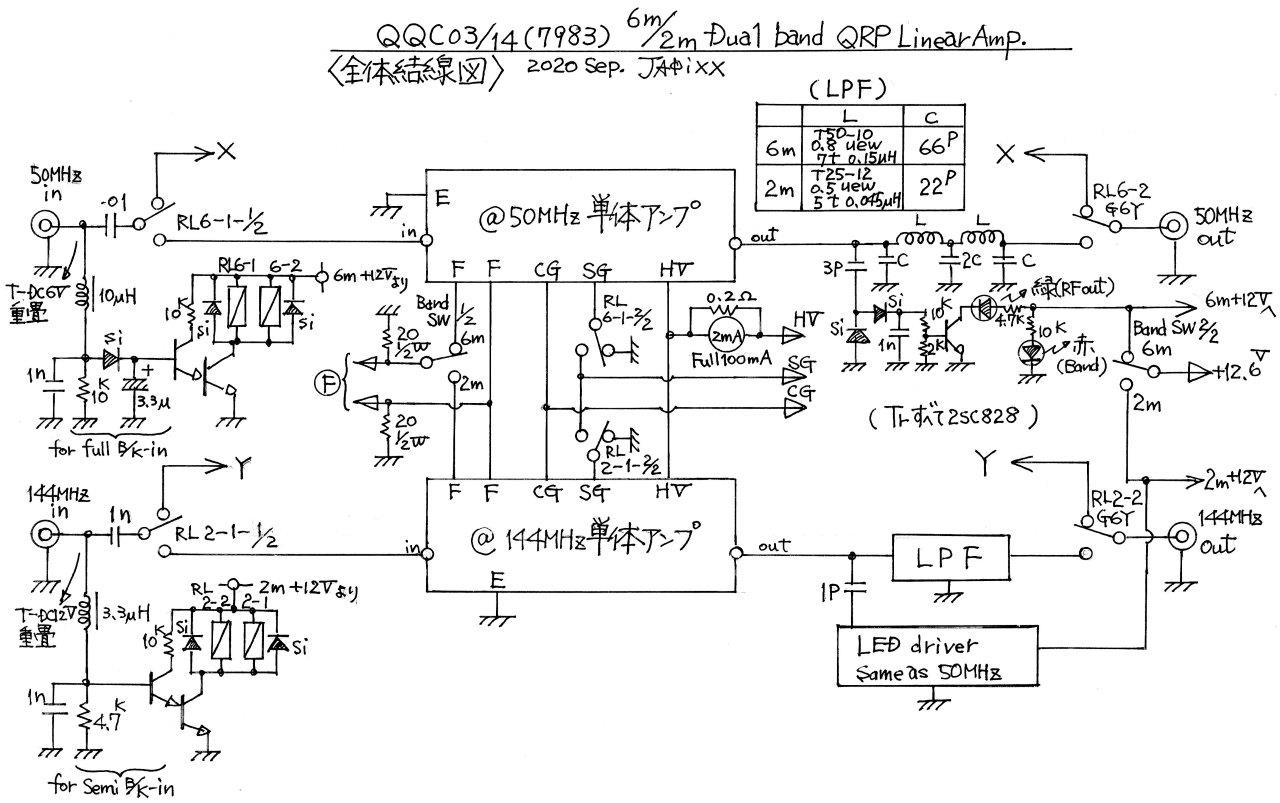
両バンドともに16dB以上のゲインがあり、飽和出力は6.5W(Ep 187V)だった。効率は50MHzが53%、144MHzはちょうど50%で、発振の気配もなく安定に動作する。PPは原理的に偶数次ハーモニクスが少なく、入出力の整合状態が良ければ第二高調波は裸で-50dBが得られる。従い、パイ型LPFを2段も入れれば高調波スプリアスはほとんど見えなくなってしまう。少し残念なのは、フィラメントを点けても薄ボンヤリとしていて、肉眼でハッキリ見えないこと。点灯外観は傍熱型の6360の方がFBだ。開局50周年の記念として、2020年10月に製作。
One day, I got a mail from Takao Yabana/JA0BZC to inform that he got some
QQC03/14 (7983) tubes. The tube is quick heating type of 6360 double tetrode,
which was manufactured for hybrid FM car transceiver formerly (1960). It’s
able to reach full output in 0.8 second after turning on the filament power.
Timing of call is important in the propagation which tends to change suddenly
like sporadic E, so it may be ideal for a QRPer of tube fan. Anyway I'm
one of 6360 fan from the old days, 50MHz/144MHz dual band amplifier of
5W output was manufactured using this right away.
JA0BZC's recent 50MHz/6360 experimental amplifier employed neither butterfly
type nor split stator type for the input/output variable tunning capacitor,
but Matsushita's small ceramic trimmer (WV: DC150V) was adopted. A tank
coil isn't a traditional type but toroidal coil. As a result, even a shielding
septum is unnecessarily, and the whole becomes very compact. This is an
excellent idea, so I decided to employ too. Because Qu of toroidal coil
falls down less than 60 on 144MHz, it was made with the traditional structure
of "shielding plate plus solenoid coil" in the 2m module. The
power supply is a diversion, which was made for my transmitter of 6939
final formerly. The SG voltage is regulated at 150V, and -15V for the grid
bias is also regulated with 7915 to suit AB2 class operation. AC3.15V to
the filament and +12.6V for the stand-by control are both switched to select
the band.
Tuning and adjustment is same as general process. First of all, it's necessary
to set the driving power to 0.15-0.2 watt on each band. The thing which
should be done next is to tune the input circuit to give a good load to
the exciter. It’s necessary to keep the input VSWR less than 1.5. If you
find the dipping point of plate current, you already have some output.
And then antenna coupling capacitance should be increased gradually until
plate current reaches to 65-70mA. If the load trimmer was tweaked, the
plate current always should be confirmed again. It isn't necessary to get
neutralization, it’s same as 6360.
This amplifier has more than 16dB gain and 6.5Watts (Ep 187V) of saturated
power on both bands. The plate efficiency is 53% on 6m, and 50% on 2m.
There are no signs of self-oscillation and the stability is excellent.
If the matching condition is good, the second harmonics can get -50dB in
case of push-pull amplifier. Therefore, if you put a two section LPF in
the output, almost no higher harmonic spurious will be seen any more. As
the activated filament isn't seen clearly by naked eyes, the 6360 of the
side heat type is much attractive in the working appearance point of view.
Manufactured in October 2020 as a commemoration of JA0IXX 50th anniversary
since 1970.